Wall Mounted Garage Storage Shelf DIY
- The Ruthless Maker
- Feb 28, 2021
- 5 min read

Since moving into our house in December 2019, our unfinished basement had been a dumping ground for all the storage bins we were too busy, too scared or just too lazy to go through.
Fast forward to December 2020, we made the decision to finish our basement which meant all those bins had to go...but to where?
The logical place was to the garage, but before we could move them, we needed a way to organize them. While surfing on Instagram for inspiration, I came across a picture of wall mounted garage storage shelves by @anawhitediy. She also had a detailed tutorial on her website on how to build it which was super handy. I used her blog as a starting point and made some changes to improve upon the design since I would be storing heavier bins on it. On to the build, here's how I built these wall mounted garage storage shelves:
Step 1: Pick a location where you want your shelves to go and clean out the space. To maximize your vertical space, pick a spot in your garage with higher ceilings. For us, we chose the wall at the back of our garage, closest to the door to the house. Since the shelving unit would hold our overflow fridge, it was important that we have easy access to it.

Step 2: Measure. Take measurements of your wall, and the bins you are looking to store. Measure out the height, width and length of the largest bin and also the height, width and length of your average size bin (the size bin you have the most of). You'll use these numbers to ensure your shelf can accommodate what you need it to. For example, here were the measurements I took for my project.

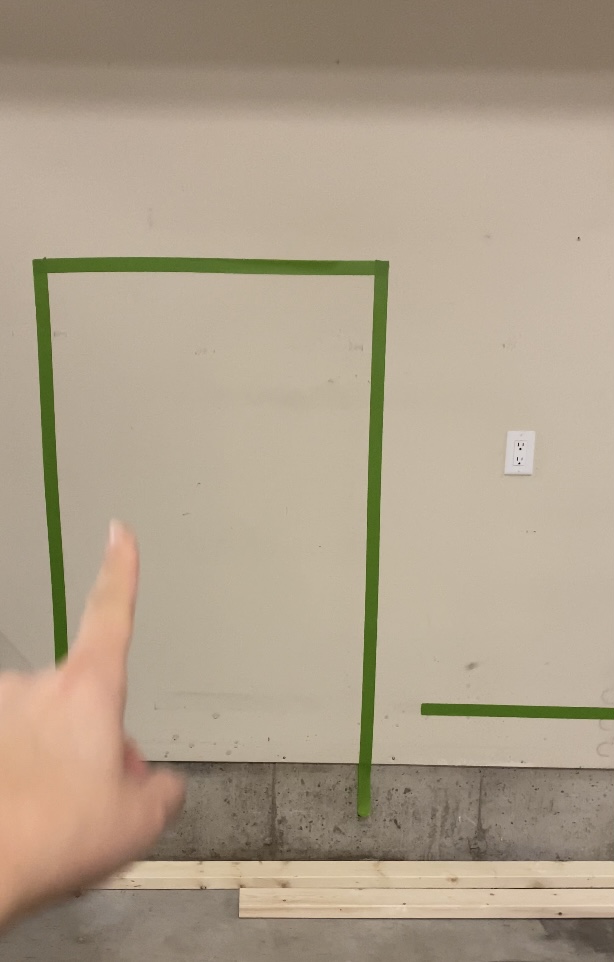
Step 3: Finalize your design. I used Google Sheets to figure out my layout and design. I knew my shelving unit had to hold at least thirty bins, contain a full size fridge and fit on my wall. Keeping in mind that wood from the store comes most readily in 8' and 10' lengths, I designed my shelf so I could fit four bins across on the lower shelves and six bins across on the higher shelves. I went with a 32" depth for my shelf so I could also fit my smaller bins double deep. Since the shelf will be attached to my garage studs in the back, I only needed three support legs in the front, one on each end and the middle one to frame out the fridge opening. If you are building a very long shelf, you will want to have a support leg at least every 8'. It helps to use masking tape to map out your shelf or make a sketch to help you visualize the shelf in the space. I did both. I used masking tape to map out the fridge size on the wall and also did a mock up sketch.


Step 4: Create your shopping list and Cut List. Now that you've designed your shelf, you can figure out what materials you need to buy. Figuring this out ahead of time, lets you save money and time in store so you're not buying more material than you need. Since the size you need for your build is not always the size you buy from the store, you'll need to figure out your buy quantities so you can minimize wastage. For example, 2x4 wood most commonly comes in 8' or 10' lengths so you'll want to figure out which size works best for you to cut your pieces from. I do this by figuring out what sizes I need for my build "the Cut List" and then do the math to figure out how many whole pieces of lumber or plywood I need "the Purchase list". For plywood, I draw out the plywood on paper and with trial and error figure out the best way to cut it to optimize the sheet. Home Depot or Rona can often cut your pieces for you. Here is the cut list and the buy list from my 10ft long storage shelf project.


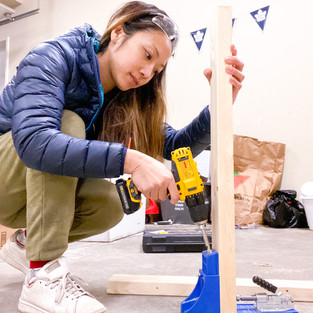
Step 5: Build. Start by installing your back supports on to the wall. I used lag bolts and 3" screws to secure the supports into the studs. The reason for using lag bolts instead of just 3" screws is because lag bolts, which are thicker in diameter, are better at carrying a load (weight) as you would in the case of a storage shelf. Screws can sheer or break when a load is applied. I used three lag bolts into the studs for each of the longer shelves, and two lag bolts each for the lower, shorter shelves. You will want to use a level to ensure each shelf is straight.

Once you have the back braces attached to the studs in the wall, attach the front brace directly on top of the back supports using a 3" screw (attached loosely because you will take these off once the leg supports are attached). This was a cool trick I learned from the Ana White tutorial to allow your front and back braces to be at the same level.

Then attach the front leg supports to the front brace using a two inch screws.

Once the front legs are attached, remove the 3" screws that you had loosely attached the front brace to the back brace and carefully set the whole front of the frame down on the ground while you attach the cross braces.

Next. attach the cross braces into the back supports using kregjig holes and screws. Kregjig holes allows you attach two pieces of wood at a 90degree angle. This was my first time using a kregjig in a project and it was super easy (and fun) to use. Here is a link to the kregjig set up I bought.


After the cross braces are in, take the front face of the frame, line it up with the cross braces and secure them with 3" screws.

Now you have your shelf frame! Almost done. The next step is to cut your plywood pieces and attach them to frame to make the shelves. I used a circular saw to cut my plywood but you could also ask the hardware store where you buy your materials if they can cut it for you. You will want your plywood seams to line up with one of your cross braces so you can screw them in and secure them. I used 1" screws to secure the plywood to the frame.


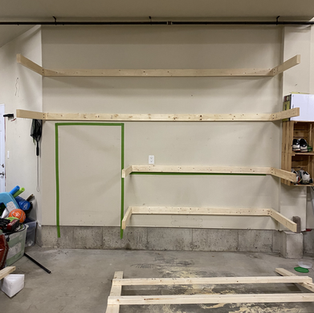
After you have the plywood attached, pat yourself on the back because you've just built yourself a storage shelf!

I hope you found this tutorial helpful. If you use these plans, please tag me on Instagram @theruthlessmaker and use the #theruthlessmaker hashtag. I'd love to see your version of this shelf!
~The Ruthless Maker